Deep Dive: Building Know Lupus with React.js

Doug Avery, Former Senior Developer
Article Category:
Posted on
Learn how Viget built the educational knowlupus.org with React.js.
This May, Viget worked with the Lupus Foundation of America to launch Know Lupus (case study) (site), a React.js-based game that teaches you about Lupus with bouncy cards and colorful illustrations. It was my first chance to work with React on a real project, so I had a blast but also learned some lessons that’ll save me time on the next project (and maybe, you too!).
Why React?
I worked with Backbone and Marionette on several other projects including DSG Running (case study) (site), and got tired of the amount of boilerplate needed to create simple elements and render them inside each other. Furthermore, Backbone’s loose model-view relationship doesn’t fit so well with highly motion-based sites — managing animation, sounds, and interface states through models can get complex quickly.
In React, making a component is as simple as typing HTML inside render(). If you want to break it up, just import smaller components and include them as <Components /> in the JSX. This is much, much smoother than managing views in Backbone, where even with the assistance of Marionette you end up defining regions by writing code in a template and transforming it to a region with an addRegions selector.
But state management is where the React + Flux architecture really shines. The state of your app is stored in a central location — at the top of the structure — and the changes trickle down through the components. You fire off Actions from anywhere in the app, and the Store listens and changes state appropriately, then broadcasts the updated state to your tree of React components. This separation seems complex at first, but in the end you write much simpler code in a place where you can easily find it, vs splitting it across several models and re-renders like you would in Backbone.
Webpack
Another important piece of Know Lupus was Webpack, another technology I was working with for the first time. Webpack is a next-level build tool like Gulp (which we've talked about before), but with a focus on connecting assets to each other via dependencies. Essentially, Webpack understands a lot more about your code than other build tools do, so it can do advanced optimizations and update code on the fly. With Webpack, I used React Hot Loader to update components and styles in real-time, trim unused code from my package automatically, and embed SVGs in my JS bundle for faster all-in-one loading.
During deploy, React-To-HTML rendered the app as static markup, and inlined my CSS into the same file. The result is a single HTML file so the intro screen actually renders on the first request. All these tricks resulted in a pretty great webpagetest.org result for a JS app.
Webpack is my build tool of choice going forward. If you haven’t, you should check out Pete Hunt’s tutorial on how to get started with it.
State
The key to getting started was to understand what states the application needed. In a simple app like Know Lupus, almost all UI state is kept together in a Store. This means that you reason about your application state — is the nav open? Has the user finished a level? What score did they get? — much earlier, and also, that you end up with a state that’s easier to understand and test. On Know Lupus, a few states in particular are especially important:
- What level is a user currently on?
- What state is a question in? Is it:
- Unasked
- Asked
- Answered, and if so:
- Correct
- Incorrect
- Or in the case of range answers, close enough?
With this basic data, we can derive the state of the app. For example:
- If level is undefined, show the title screen.
- If level is 1, and the first 4 questions are answered, show the 5th question.
- If level is 2 and all questions in the level are answered, show the score screen
None of these are particularly complex states, so within a couple of hours, I had a working prototype. From that point, layering on more states like overlays and whether the nav was open or closed was pretty simple.
If you’re getting started with React, I’d encourage you to start with state — build a rough understanding of your data and how it changes before you get too deep into components. It’s tempting to let components define state, interact with each other, or talk to their parents, but most of the time you don’t need to make them do anything more than render and fire actions, so long as you have good state defined at the top of your application.
Sounds
With React, playing sounds was surprisingly easy. Even though playing a sound is an imperative command in the browser, you can transform the process into a React-like declarative one by having a <Sound /> component that monitors state change with componentDidUpdate. This way, playing the sound you want is as easy as changing props.sound to a new value (although it helped that I never have to play the same sound twice in a row).
export default React.createClass({
  componentDidMount() {
  this.getDOMNode().volume = this.props.volume || 1
 },

 componentDidUpdate(prevProps) {
  if (this.props.play === true && prevProps.play === false) {
    this.getDOMNode().play()
  }
 },

  render() {
    return <audio aria-hidden="true" preload>
      <source src={require(`../../../../sounds/${ this.props.sound }.ogg`)} type="audio/ogg" />
      <source src={require(`../../../../sounds/${ this.props.sound }.mp3`)} type="audio/mpeg" />
    </audio>
  }
})
Full-screen transitions

My favorite animations on the project are the transitions from the start screen to the level, and then from one level to the next. Since React components directly reflect state, I wasn’t initially sure how to do a transition like this that requires both screens to be rendered at the same time. It turns out React provides a special component for transitioning elements in and out, called the ReactCSSTransitionGroup. This worked at first, but I ran into issues on animations where I wanted the onscreen elements — not the screens themselves — to animate, since the CSSTransitionGroup only listens to onTransitionEnd events on the top-level element.
Fortunately, Khan Academy wrote a different transition group based on timeouts which works perfectly. I can pass it arbitrary timers and it’ll keep the elements onscreen and properly classed until I’m done.
Analytics
After you launch something, you want to know it works. That’s why we built in analytics that let us share an in-depth view of site performance with the Lupus Foundation of America.
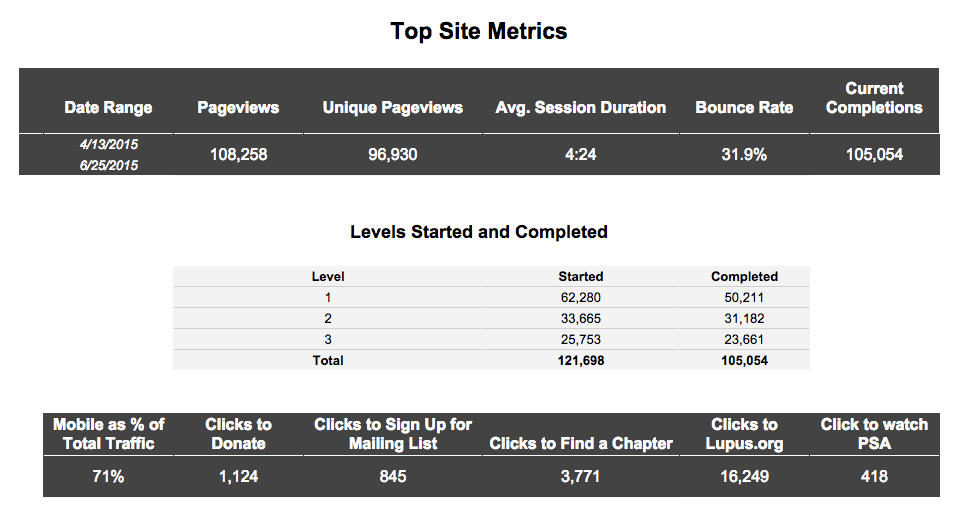
This required firing specific events when users completed a question correctly or incorrectly and when they finished a level, which was a snap with the Flux architecture — since these events already trigger actions in the store, I just added dataLayer.push calls there.
...
beginLevel(levelId) {
this.content.level = levelId
this.content.sound = 'begin'
this.content.announcement = `Starting level #{levelId}`
setTimeout(() => {
this.askNextQuestion(levelId)
}, this.startDelay)
dataLayer.push({
event : 'startLevel',
levelNumber : levelId
})
},
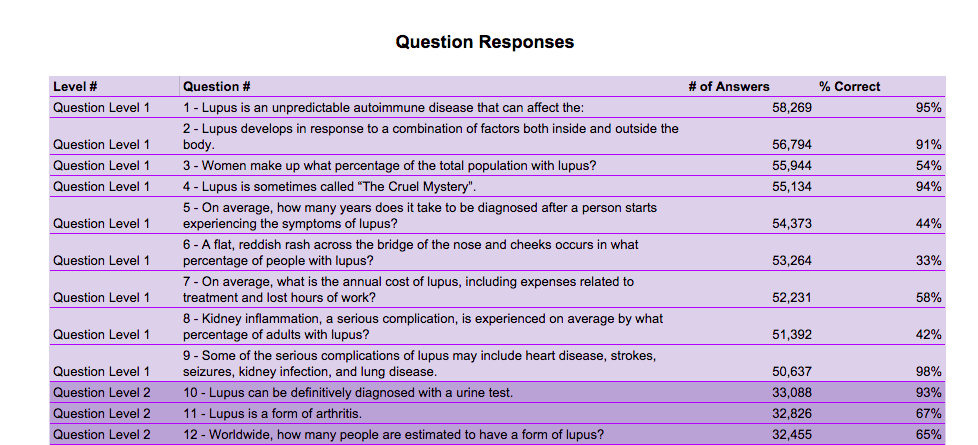
...The lesson here is that custom analytics events fit perfectly into Flux, since practically every user interaction has its corresponding Action to hook into. This way, we were even able to track data about how users answered particular questions.
Accessibility
Accessibility can be tricky in JS apps for the same reason that everything else can be tricky: State. Screenreader and keyboard users, by default, have little trouble with websites that reload the page on each action, but JS apps pull the rug out from under them by appending new objects or rewriting entire pages without warning. Even simple modals can be a nightmare for screenreaders, but with a little extra care, you can restore accessibility to your JS app by making sure keyboard focus goes where you want it to.
On Know Lupus, all the cards in a level are on-screen at once, so I struggled with how to keep keyboard users and screenreaders from looking ahead or accidentally answering future questions. The result was a React mixin that toggled tabindexes and aria-hidden attributes, which felt smart at the time but wasn’t the right answer — in retrospect, all I had to do was visibility: hidden the inactive card faces. Lesson learned: use aria-hide and tabindex as a last resort.
On the other hand, React made aria-live announcements a snap – I pulled them off with a tiny component and a few simple state updates.
export default React.createClass({
  render() {
    return <div className="screenreader-only" aria-live="assertive">
      {this.props.announcement}
    </div>
  }
})
Wrap-up
We officially launched the project on May 1st, and by the end of the month we already had over 100,000 plays! Users clicked the Pinterest, Twitter, and Facebook buttons over 10,000 times by the start of July, making Know Lupus the most successfully viral project I’ve worked on at Viget (and one of the most fun!).