Photoshop Masking Tips
Steve Schoeffel, Former Designer
Article Category:
Posted on
The work that I've been doing recently has required quite a bit (read: tons and tons) of masking in Photoshop. While working through the images and trying to improve efficiency along the way, I've picked up a few useful methods that I'd like to share because they've been helpful to me. The intent of this post is not to explain what layer masks are and the very basics of using them. Rather, I simply want to pass along some reflections and techniques that I've picked up from doing a fairly specific type of masking work. Also, for any new Photoshop users, if you aren't currently using layer masks, start now because you're missing out!
I will say as a side note that there are tons of different masking scenarios. It all depends on what you need to mask. In my case, the last couple of weeks have been spent on product images for the big Puma.com launch. This means that, for the most part, I'm dealing with clearly defined objects that are on a white background (in some cases with a light gray vignette).

Process
Here is the work flow that I've been using. It starts with what for me has become a pretty typical masking sequence.
- Step 1: Duplicate the image.
- Step 2: Create a new layer and fill it with a solid color that's not in the image you're masking (I use red the most) and move it below the image to be masked. This allows for you to see clearly what you have masked.
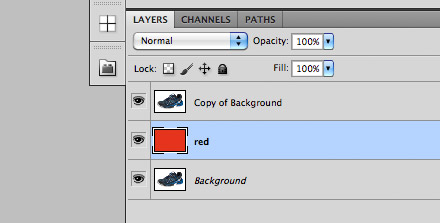
- Step 3: Use the magic wand to select the background.

- Step 4: Refine your selection.
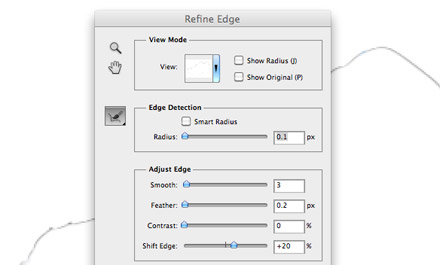
- Step 5: Apply layer mask. If you've selected the background like I have here, hold down Alt/Control as you apply the mask. If not, you will just have to invert the mask once it's applied.
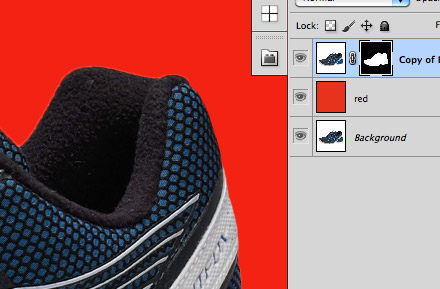
Because this process was the same for each image, I bundled the steps into an action. I set the magic wand to sample a point in the top left of the image as this would always select the background and not part of the product itself. I also added a second version of this action that included a lower tolerance number for the magic wand and used this for images that contained white along the edges and therefore did not offer much contrast to the white background.
The magic wand, despite being a huge time saver, does not always produce the best or most accurate results. Due to this, there is a certain amount of touch-up work that is needed for most images. For this part of the process, I've found that these two steps can be really helpful:
- Step 1: Hide the layer mask (shift + click the layer mask box).
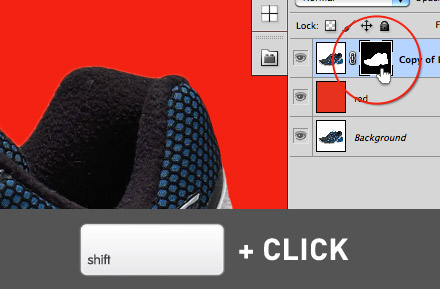
- Step 2: Press the backslash key.
In doing this, you should see your masked area in red (default opacity is 50%). But the big thing is that you can also see the image you are trying to mask. With these settings, take your brush tool and make your needed touch-ups without having to flip between your masked view and your original image. I've found this incredibly helpful because I can paint the layer mask with confidence, knowing I'm not chopping off something important or including some of the background in my selection.
And the final product.

Tools
Overall, I'd say that some of the most essential parts of the process have become:
- Utilizing actions for common steps. This will save you time and sanity on the repetitive tasks.
- Shortcuts for everything else. Bonus points for shortcuts that trigger actions. Double whammy!
- Using a pen tablet. I find the pen tablet indispensable for masking and hugely superior to using a mouse. You get greater control and it's pressure sensitive. Not convinced? Blair wrote a post about why she uses them. We are both huge fans.
What About You?
Have any relevant masking tips to pass along? Share them in the comments below!