10 Omnigraffle tips you might not know (plus one bonus!)

Todd Moy, Former Senior User Experience Designer
Article Categories:
Posted on
Over the past four months, I've been using Omnigraffle as my go-to diagramming app. During that time, I've collected a small set of tricks that make wireframing and diagramming easier.
If you're a grizzled 'graffle veteran or someone who reads manuals, some of these might be old hat. But maybe not – so check them out. If you've got any of your own, post them in the comments.
Tip 1: Use style chicklets to clone styles
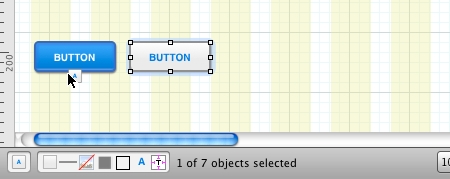
Occasionally, you want to apply all of one object's styles to another. Sometimes you just want the gradient and the stroke – but not the text or shadow. Here's where the chicklet tray comes in handy.
When you select an object, its styles are shown in a tray at the bottom of the canvas. The first chicklet represents all styles for the shape. The others are fill, stroke, image, shadow, shape, font, font color and text alignment respectively. (whew!)
Just drag the chicklets you want to the destination object. That's it.
Tip 2: Select similar objects to operate on
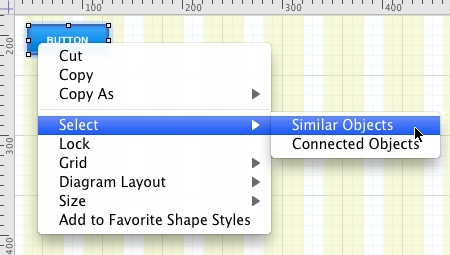
Sometimes you want to monkey with the styling for a set of similar objects. Perhaps you want to change the border and shadow on all your sitemap's boxes at once.
Provided you've been pretty consistent about using stencils, you can quickly select those objects that have the same traits. Right-click one object and choose Select > Similar Objects. Style as needed.
Tip 3: Use character replacements as shortcuts
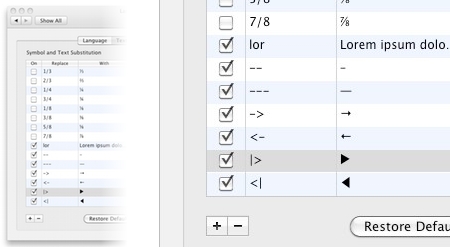
It’s a pain for me to find the little black triangle dingbat. And the arrow. You could spend the time wading through the Characters palette each time. Or you could build these little bits into a stencil. Using character replacements, however, puts these fiddly bits at your fingertips. Once these are set up, you can type a short abbreviation and have the system replace that with the chosen alternative.
Just go to the Language & Text control panel and choose Text. In the left panel you can add new text substitutions. Right now, the ones I use are:
- “lor” generates a sentence of “Lorem ipsum” text.
- “|>” and “<|” generate dark triangles in either direction
- “->” and “<-” generate arrows in either direction
To use these, type the short abbreviation somewhere in your document and then select it. Right click the selection and choose "Replace with ...". Amaze your friends; astound your neighbors. Or just get on with your day.
Tip 4: Manipulate objects with math
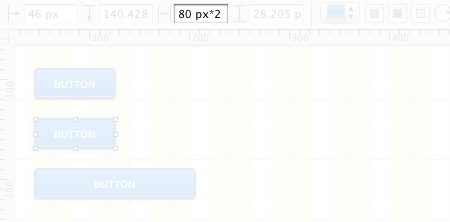
Occasionally, I want to divide a region on a page with a specific number of equal width columns. Or I want an object whose size is an exact multiple of another.
In these cases, I head to the Rulers toolbar where I can do basic math operations: addition, subtraction, multiplication and division. After selecting an object, go to the toolbar and tack on an operator and value – something like "*2", "/4" or "-10". Hit enter and see the magic.
Did you also know you can use the arrow keys in these fields to manipulate items in single pixel or grid increments? Try it.
Tip 5: Move a selection to a different layer
Moving objects between layers is not very clear in Omnigraffle. Fear not young Padawan, there are two ways to accomplish it. Either one will get you there but one might better fit your flow.
First, select the items on the canvas you want to move elsewhere. Then:
Option 1: Contextual Menu
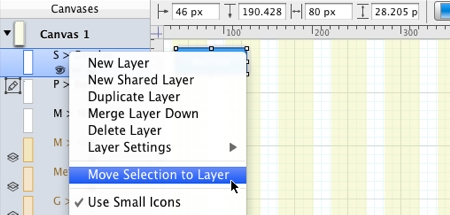
Right-click the destination layer and choose "Move selection to layer".
Option 2: Outline + Canvas Sidebars
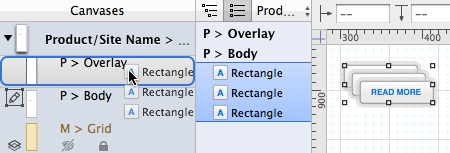
Turn on both the canvas and outline sidebars, if they're not already. As you select items on the canvas, you'll see them highlighted in the outline view. Click and drag the outline view icons(s) onto the layer you want.
Tip 6: Move a shape forward

As far as I can tell, Omnigraffle has the command "Move to front" but no "Move forward." This seems a strange omission to me, but you can use this hack to accomplish the same task.
Choose the item you want to move forward or backward. Then, with the Outline sidebar open, drag the object's icon up or down in the list. Up is forward; down is back.
Edit: Holding down Option-Command-F will move the object forward in space. Thanks to William Van Hecke and Kirschen Seah for setting me straight. :)
Tip 7: Paste unformatted text
If you copy and paste text within Omnigraffle – or from other apps into it – you'll notice it carries its formatting along. I hate that baggage, so I use Edit > Paste and Match Style. This saves you from having to sanitize it through Textmate first.
The keyboard command is funky, but you can override this in OS X's Keyboard Shortcut preferences. I use Indesign's version: Command-Shift-V.
Tip 8: Pin palettes open
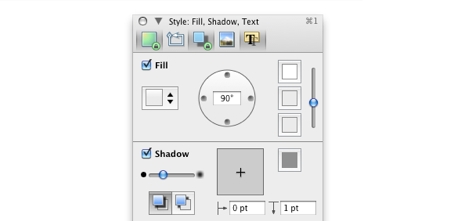
Omnigraffle's palettes are the polar opposite of the double-rainbow, driving people to bouts of Tourette’s and uncontrollable sobbing. Learning to pin them open won’t solve your problems, but will make you less of a spectacle among your co-workers.
Succinctly, you can open multiple tabs concurrently within a palette. Double-click the tab and a small lock will appear in the bottom right. Continue to do this with other tabs as you like. Double-click to unpin.
Tip 9: Make a custom color palette
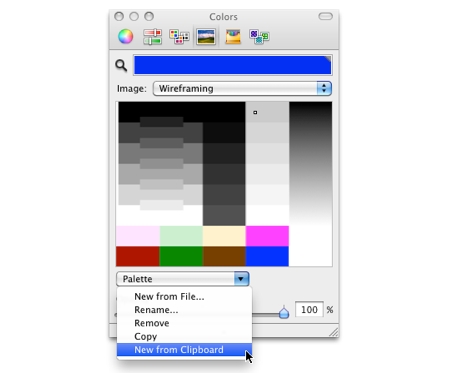
Like most wireframes, mine are rendered in shades of gray with occasional splashes of color. Despite the limited palette, it's still hard to keep the the shades and tints straight. The swatch drawer is a fair place to keep these, but I find the little squares hard to distinguish.
Instead, I created a custom palette based on a limited set of colors I use. Making your own is easy. Just draw out and color a set of boxes in Omnigraffle. Then select them all, copy and choose "New from clipboard".
Tip 10: Make master objects
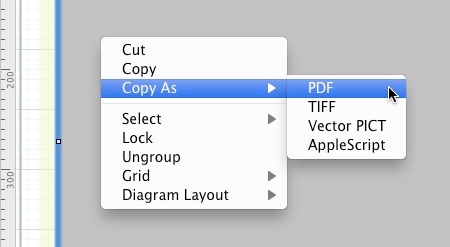
I wrote about this before, but I think it’s freaking awesome. You can create objects that remain globally editable in Omnigraffle. Have a footer that’s positioned different on all pages – but has the same content? Make a master.
Just select the objects you want to make a master, right-click them and choose "Copy as PDF". Paste wherever you need. Edit it by double clicking it.
Bonus: Masking an object
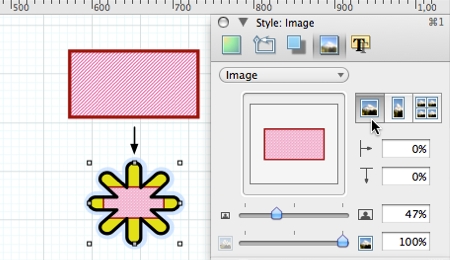
Extending the capabilities of Master Objects, you can also mask those objects. This is especially nice for those cases where you need to show a bit of an object – but overlaying a white object on it won't work.
Simply create your object or group of objects, then Copy as PDF. Paste it, then go to the Image tab. Choose the "Natural Size" button, which is the first one in the top row. From there you can drag and scale the object within the space. If you want to get more creative, you can change the shape of the mask using the Shape tray within the stroke panel. The example above shows a star-like shape masking a striped rectangle.