Motion Magic: Project Insights From My Viget Internship
Ciel Park, Former UI Developer Intern
Article Categories:
Posted on
When we open an app or website, we do so to accomplish a task or find information. A well-designed user experience ensures users can achieve their goals efficiently. But what keeps us engaged beyond basic functionality? What differentiates a mundane interface from an exciting one? In my opinion as an up and coming UI developer, one key element is motion.
During my summer internship at Viget, I had the opportunity to dive deep into the world of agency work. From getting the chance to contribute to client sites to participating in a hackathon and pursuing a personal project, I seriously leveled up my stack and gained valuable development experience. Not to mention the amount I learned from exceptional, dedicated mentorship and micro-classes on everything from React to SQL to business models.
However, coming into the internship, I had the specific goal of learning how to add motion to my web projects. I walked in on day one with no idea where to start, and now I’m leaving my last week with a complex knowledge of Rive, canvas elements, JavaScript animation, GSAP, and more. Here’s how…
Spinet

In this two week hackathon project, I worked alongside Faye and Paul, the Product Designer and App Developer interns, to create a spinning wheel name picker. During the first week, I took on branding and visual design work.

I spent the second week implementing wireframes. Through this project I learned how to transform client specifications into design directions, a style guide, and ultimately, UI components.
For this app, the motion of the spinning wheel was critical to the experience. Initially, client feedback indicated that the spin felt too uniform. I adjusted the motion parameters by extending the slowdown time and changing the easing function from linear to cubic, which increased feelings of suspense at the end of the spin animation.
To add a level of joy and celebration to the winner announcement popup at the end of a spin, I incorporated confetti animations. In doing so, I discovered the world of JavaScript animation libraries that make implementing animations as easy as simple as adding the script to my HTML and adjusting the timing and placement of the animation object. Finally, we had ultimately decided on a modern, clean-cut video game aesthetic for the branding, and pulled this in through inspired sound effects, the logo design, and a 3D button component with a click animation accomplished entirely through Tailwind.
Luna chatbot

After the hackathon, I got the chance to work on a personal project of my choice: an AI mental health chatbot inspired by tools like Woebot and EarKick. I was motivated by the question of what could make conversational AI feel less intimidating and more empathetic. My answer was an AI support companion with an animated avatar to enhance feelings of emotional connection and understanding.
To get started, I experimented with various chatbot APIs and found that the Llama3 model was the best at following system prompts and offered the most natural interactions. A huge part of this project was the chatbot’s expression animations. I surveyed several popular tools and found Rive was the best fit for this, offering intricate animation capabilities, easy web integration, and a state machine for managing overlapping states and complex transitions.
The first step of animating in Rive is to create a design. Luckily, Rive has a vibrant open-source community, and I learned a lot from examining and remixing community files. The second step was learning to create the animations themselves. This was my first time animating anything, but the concept of keyframes was relatively intuitive, and the UI reminded me of video editing software, like iMovie, I’d used in the past.
The third and most challenging step for me was making all the animations work together in a state machine.
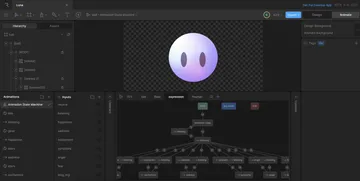
This is the logic that connects animations together, taking input values that determine when to transition between states. Getting smooth animations between emotional states required a lot of rewiring and experimenting. Finally, embedding the Rive file in my project and linking the emotion data from API responses to the animation inputs was relatively straightforward using vanilla JavaScript.
In conclusion
Animations, whether simple or complex, add a layer of interactivity and visual interest to digital products. Over a short 10 weeks, my internship projects allowed me to explore UI development, modern animation tools, and motion using CSS and JavaScript.
If you’re interested in bringing ideas to life and sparking joy through motion design, then diving into a passion project, seeking inspiration from the community, and exploring tools like Rive and GSAP will definitely kickstart your journey!