How we use DDEV, Vite and Tailwind with Craft CMS

Say goodbye to complex Webpack & Docker configurations! Embrace the simplicity of Vite & DDEV for your Craft CMS projects.
In 2022 we changed our dev tooling for new Craft CMS projects. Goodbye complex esoteric Webpack configuration, hello Vite. Goodbye complex esoteric Docker Compose configuration, hello DDEV. This small change in tooling has completely transformed our development experience. We start work faster and avoid wasting billable time debugging Webpack and Docker.
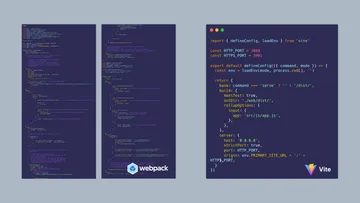
From Webpack to Vite #
Webpack has been the defacto way of bundling JavaScript and front end assets. It’s a powerful tool… but with that great power comes great responsibility complexity.
Vite bills itself as the “next generation” of frontend tooling. Vite is much faster at bundling. But more importantly… its default configurations work great for most website projects.
Before (Webpack) #
Well over 300 lines of configuration spanning three files. Good luck making changes!
After (Vite) #
A crisp 30 - 50 lines of code. Want to switch to TypeScript? Need to drop in a popular front-end framework? Easy! All it takes is adding a plugin and 2-3 lines of config.
Deleting old code has never felt this good!
From Docker to DDEV #
Docker is another development staple. It isolates server infrastructure into virtual “containers.” This helps avoid issues that arise from each developer having a slightly different setup. However, Docker can have a learning curve. Config changes, PHP upgrades and unexpected issues often eat up precious project time.
Enter DDEV! DDEV describes itself as “Container superpowers with zero required Docker skills: environments in minutes, multiple concurrent projects, and less time to deployment.” We’ve found that statement to be 100% true.
Before (Docker) #
Every Craft project has a different Docker config. Bugs and upgrades required deep Docker experience. Last (but not least), it was difficult to run several projects at one time (ports often conflict).
After (DDEV) #
Performance is consistently better than our hand-rolled setup thanks to Mutagen and faster DB import/exports. Simultaneous projects run out of the box. DDEV provides (and maintains) a growing list of helpful shortcuts and DX features.
Getting started #
Ready to make the switch? Here’s how to set up DDEV, Vite and Tailwind on your own Craft project.
Show me the config files already! #
If you would rather see full config files instead of following step by step, check out our Craft Site Starter on GitHub.
DDEV #
Let’s set up a fresh DDEV project and start customizing.
- Make sure you have DDEV installed on your computer.
- If you’re a PHPStorm user, install the exceedingly helpful DDEV plugin. VS Code users have a similar plugin too!
- Follow Craft’s guide for creating a new project (they love DDEV too).
Now you have a fresh .ddev/config.yaml just waiting to be customized.
Node Version #
Open your DDEV config and make sure your Node JS version matches Vite’s recommendations.
nodejs_version: '20' # Vite 5 expects Node 18+Ports for Vite’s dev server #
Next, expose ports that Vite’s dev server uses will use to serve assets.
web_extra_exposed_ports:
  - name: vite
    container_port: 3000
    http_port: 3000
    https_port: 3001
Routing ports can sometimes be confusing. This diagram might help!
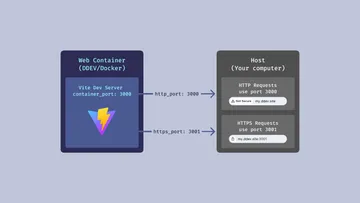
- Vite’s dev server runs inside of DDEV’s web container (a Docker container).
- Until we expose these extra ports, any custom port within DDEV is unavailable to your host machine (your computer).
- When it’s time to configure Vite, we’ll use port 3000
- HTTP and HTTPS traffic must use separate ports.
- We use port 3000 for
httptraffic and 3001 forhttps
Run Vite automatically #
Usually, you’ll want Vite to watch and build files automatically after you start a DDEV project. Using web_extra_daemons adds a separate background process (daemon) for Vite.
web_extra_daemons:
  # Run Vite in a separate process
  - name: 'vite'
    command: 'npm install && npm run dev'
    directory: /var/www/html
Use hooks to improve DX #
DDEV’s powerful hooks system can run tasks before or after various DDEV commands. These post-start tasks keep dependencies and schemas up to date every time you start DDEV.
hooks:
  post-start:
    - composer: install # Keeps installed packages up to date
    - exec: ./craft up # Apply migrations & project config changes
Time for Vite #
Vite is a Node app that’s installed with NPM. Your project will need a package.json. If you don’t have one set up yet, follow NPMs initialization script.
ddev npm init

# Don't forget to ignore node_modules!
echo node_modules >> .gitignore
👆Why ddev at the start of the command? This let’s us run NPM from within DDEV’s Docker containers. This means you’ll always be using the Node version configured for this project. DDEV has a bunch of shortcuts and aliases for running CLI commands (such as npm, yarn, craft and composer).
Make sure your NPM package is configured for ES Modules #
Our various config files will be using ES Module syntax for imports and exports.
ddev npm pkg set type=moduleInstall Vite! #
ddev npm install --save-dev viteAdd convenience scripts to package.json #
"scripts": {
  "dev": "vite",
  "build": "vite build"
}
npm run dev runs Vite in dev mode. It watches and builds your files every save. Files are served through Vite’s dev server.
npm run build bundles your JavaScript, CSS and static images for production. Your deploy process will usually call this script.
Configure vite.config.js #
Running Vite for a server rendered CMS requires some extra configuration. These options put production files in the right spot and keeps Vite’s dev server running on a specific port.
import { defineConfig, loadEnv } from 'vite'

// Match ports in .ddev/config.yaml and config/vite.php
const HTTP_PORT = 3000
const HTTPS_PORT = 3001

export default defineConfig(({ command, mode }) => {
  const env = loadEnv(mode, process.cwd(), '')

  return {
    // In dev mode, we serve assets at the root of https://my.ddev.site:3000
    // In production, files live in the /dist directory
    base: command === 'serve' ? '' : '/dist/',
    build: {
      manifest: true,
      // Where your production files end up
      outDir: './web/dist/',
      rollupOptions: {
        input: {
          // The entry point for Vite, we'll create this file soon
          app: 'src/js/app.js',
        },
      },
    },
    server: {
	    // Special address that respond to all network requests
      host: '0.0.0.0',
	    // Use a strict port because we have to hard code this in vite.php
      strictPort: true,
      // This is the port running "inside" the Web container
      // It's the same as continer_port in .ddev/config.yaml
      port: HTTP_PORT,
      // Setting a specific origin ensures that your fonts & images load
      // correctly. Assumes you're accessing the front-end over https
      origin: env.PRIMARY_SITE_URL + ':' + HTTPS_PORT,
    },
  }
})
Add JavaScript and CSS files (Entrypoint) #
Vite needs an entry point to determine what JavaScript, CSS and Front End assets it needs to compile. Remember src/js/app.js that we defined in vite.config.js? Let's make that file now.
/* Make a file in src/js/app.js */

import '../css/app.css'

console.log('Hello Craft CMS')
We’ll also add our CSS as an import in app.js . In plain-old-JavaScript you can’t import CSS files. However, Vite uses this to figure out CSS dependencies for the project.
Once Vite builds everything for production, you end up with a separate CSS file. The Craft Vite plugin includes this automatically with along your JavaScript bundle.
/* Make a file in src/css/app.css */

body {
	background-color: peachpuff;
}
Install the Vite Craft Plugin #
ddev composer require nystudio107/craft-vite
ddev craft plugin/install vite
Vite assets have different URLs in dev mode vs. production. In dev mode, assets are served from Vite’s dev server. It uses the ports that we defined in our DDEV & Vite configs.
When Vite builds for production, filenames are hashed (app.js becomes app-BZi_KJSq.js). These hashes change when the contents of the file changes. Browser can cache these files indefinitely. When an asset changes, a whole new file is served.
To help find these hashed filenames, Vite creates a manifest.json file. The manifest associates the name of your asset src/js/app.js to the hashed file that ends up on your server web/dist/assets/app-BZi_KJSq.js
The Craft Vite Plugin by NYStudio107 takes care of all this routing for you.
{
  "src/js/app.js": {
    "file": "assets/app-BZi_KJSq.js",
    "name": "app",
    "src": "src/js/app.js",
    "isEntry": true,
    "css": ["assets/app-BXePGY5I.css"]
  }
}
Configure the Vite Craft Plugin #
Make a new plugin config file in config/vite.php
<?php

use craft\helpers\App;

// Use the current host for dev server requests. Otherwise fall back to the primary site.
$host = Craft::$app->getRequest()->getIsConsoleRequest()
    ? App::env('PRIMARY_SITE_URL')
    : Craft::$app->getRequest()->getHostInfo();

return [
    'devServerPublic' => "$host:3001", // Matches https_port in .ddev/config.yaml
    'serverPublic' => '/dist/',
    'useDevServer' => App::env('CRAFT_ENVIRONMENT') === 'dev',
    'manifestPath' => '@webroot/dist/.vite/manifest.json',
    // Optional if using React or Preact
    // 'includeReactRefreshShim' => true,
];
Include your Vite bundles in Twig #
The script and asset functions includes the appropriate files depending on in if you’re in dev mode or production. Clear out your templates/index.twig file and add the following snippet to your <head> tag.
{# Load our main CSS file in dev mode to avoid FOUC #}
{% if craft.vite.devServerRunning() %}
    <link rel="stylesheet" href="{{ craft.vite.asset("src/css/app.css") }}">
{% endif %}

{{ craft.vite.script('src/js/app.js', false) }}
Whew! 😅 We’re at a point now where we can test our integration. Run ddev restart and then ddev launch . You should see “Hello Craft CMS” in your browser console.
Setup Tailwind #
Now that Vite is processing src/css/app.css, it’s time to install Tailwind and really get cooking.
These steps are based on Tailwind’s official installation guide. But make sure to run all commands from within DDEV.
Install packages #
ddev npm install -D tailwindcss postcss cssnano autoprefixer
# No DDEV shortcut for npx :(
ddev exec npx tailwindcss init -p
Configure template paths in tailwind.config.js #
/** @type {import('tailwindcss').Config} */
export default {
	// Watch Twig templates and any JS or JSX that might use Tailwind classes.
  content: ['./templates/**/*.twig', './src/**/*.{js,jsx,ts,tsx,svg}'],
  theme: {
    extend: {},
  },
  plugins: [],
}
Configure postcss.config.js for production #
export default {
  plugins: {
    tailwindcss: {},
    autoprefixer: {},
    ...(process.env.NODE_ENV === 'production' ? { cssnano: {} } : {})
  }
}
Add Tailwind directives to src/css/app.css #
@tailwind base;
@tailwind components;
@tailwind utilities;
You’ll most likely need to run ddev restart again to get Vite to recognize your new Tailwind config.
❓ Do i need to set up live reload of Twig? Turns out it’s already done for you! Styling a Tailwind project means editing Twig files to change styles. It’s super handy to reload your browser every time you save. Normally you’d reach for vite-plugin-restart to get this functionality. However, Tailwind’s JIT mode automatically notifies Vite when CSS has compiled and the page should reload.
That's a wrap! #
That’s all it takes to configure a minimal DDEV and Vite project! We’ve found that both of these tools are easy to extend as a project get more complo'ex. Adding things like Redis or React are just a plugin install and a few lines of config away.
💻 If you'd like to see this setup (and more) in a real-world Craft CMS project, check out our Craft Site Starter on GitHub.
Go forth and Vite + DDEV to your heart’s desire.