Custom File Inputs with a Bit of jQuery
Trevor Davis, Former Front-End Development Technical Director
Article Category:
Posted on
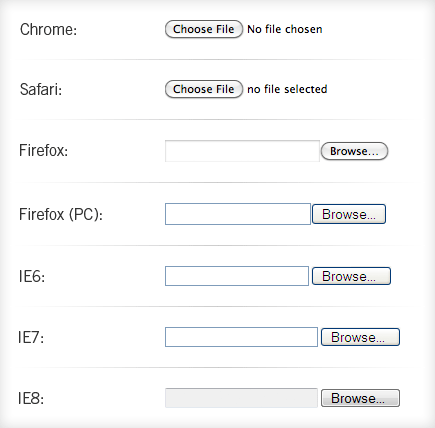
File inputs are notorious for being a pain to style across all browsers. In the following image, you can see the difference between the default file inputs in the major browsers:

That's pretty gross. I was surprised to see that even Chrome and Safari are different.
![]()
For a recent project, the comp had a form to allow users to upload a photo, but the button was completely custom. So I was challenged to come up with a way to make that button similar across all browsers.
What followed was some CSS trickery and a bit of jQuery to make the input a little more functional.
Starting Simple
Let's start by wrapping the file input in a span, and adding an additional span to hold the text for our custom button:
<span class="file-wrapper">
  <input type="file" name="photo" id="photo" />
  <span class="button">Choose a Photo</span>
</span>
Then, let’s add a little CSS to the wrapper span:
.file-wrapper {
  cursor: pointer;
  display: inline-block;
  overflow: hidden;
  position: relative;
}
While we are in the CSS, let’s just style our custom button:
.file-wrapper .button {
  background: #79130e;
  -moz-border-radius: 5px;
  -webkit-border-radius: 5px;
  border-radius: 5px;
  cursor: pointer;
  display: inline-block;
  font-size: 11px;
  font-weight: bold;
  padding: 4px 18px;
  text-transform: uppercase;
}
Choose a Photo
Now, let’s deal with the actual input by absolutely positioning it and assigning it a height:
.file-wrapper input {
  cursor: pointer;
  height: 100%;
  position: absolute;
  right: 0;
  top: 0;
}
Choose a Photo
Getting a Little Tricky
So now the file input is sitting on top of our “custom button”. What would happen if we dropped the opacity of the input so that the file input was still clickable, but we could see through it?
.file-wrapper input {
  filter: alpha(opacity=50);
  -moz-opacity: 0.5;
  opacity: 0.5;
}
Choose a Photo
Ohh, now that is fun! So let’s lower the opacity so that the input is invisible but still clickable:
.file-wrapper input {
  filter: alpha(opacity=1);
  -moz-opacity: 0.01;
  opacity: 0.01;
}
Choose a Photo
One More Thing
That button looks just like the comp! But there is just one problem…the button is not clickable in certain areas in some browsers. So after talking with Jason about the problem, he suggested making the font size of the input really big. And it worked!
.file-wrapper input {
  font-size: 100px;
}
Choose a Photo
With that, our button looked great and worked consistently across all browsers. My one big issue was that you would not get feedback once you had selected a file to upload. So I wanted to use JavaScript to add that additional functionality.
The JavaScript
Since the site was already using jQuery, our library of choice, it was pretty easy to add that functionality. First, I start by setting up my function and which elements I want to call the function on (Note: line wraps added for readability):
VIGET.fileInputs = function() {
  …
};
$(document).ready(function() {
  $('.file-wrapper input[type=file]')
  .bind('change focus click', VIGET.fileInputs);
});
Next, let’s define a couple of variables:
VIGET.fileInputs = function() {
  var $this = $(this),
      $val = $this.val(),
      valArray = $val.split('\\'),
      newVal = valArray[valArray.length-1],
      $button = $this.siblings('.button'),
      $fakeFile = $this.siblings('.file-holder');
};

$(document).ready(function() {
  $('.file-wrapper input[type=file]')
  .bind('change focus click', VIGET.fileInputs);
});
The only complex part of that might be the valArray variable. When the value is returned from the browser, it looks like this: C:\fakepath\filename.jpg. So we just want to get the file name portion as the new value.
Then, if the new value is not empty, let’s update the text and display the filename:
VIGET.fileInputs = function() {
  var $this = $(this),
      $val = $this.val(),
      valArray = $val.split('\\'),
      newVal = valArray[valArray.length-1],
      $button = $this.siblings('.button'),
      $fakeFile = $this.siblings('.file-holder');
  if(newVal !== '') {
    $button.text('Photo Chosen');
    if($fakeFile.length === 0) {
      $button.after('' + newVal + '');
    } else {
      $fakeFile.text(newVal);
    }
  }
};

$(document).ready(function() {
  $('.file-wrapper input[type=file]')
  .bind('change focus click', VIGET.fileInputs);
});
Choose a Photo
And just like that, we’ve got a a fully functional custom file input button! You can see the entire script in this gist. Let me know if you find any issues.