Single-click layer exporting in Photoshop
Dan Tello, Former Senior Front-End Developer
Article Category:
Posted on
Use this sweet photoshop action to save out layers and groups with one click.
One of the most repeated tasks in the build-out process is saving out an individual asset in the comp as a .png or .jpg. If you ever find yourself repeating the same sequence of actions over and over again in Photoshop, STAHP, and open up that dusty actions pallet.
![]()
Before we get into actions, lets compare two ways to do this manually...
A bad way:
- Turn off all the layers behind your asset
- Use the slice tool
- Zoom in 1000% to make sure you're not cutting off any pixels, or leaving any blank ones.
- Save for web
- Delete all of the non-slices you just accidentally exported along with the one slice you did want, because you forgot to customize your export options.
- Remember which layers you hid to export that one piece, and re-enable them.
- Delete the slice you created that's overlapping another asset you need to cut out separately.
- Have an emotional breakdown as you realize you must repeat this process 99 more times today.
This was my terrible work flow years ago. Let's never go back there, friends. There is a better way.
A better way:
The best thing about this workflow, is that it's COMPLETELY automatable, meaning we can turn this in to a reusable action.
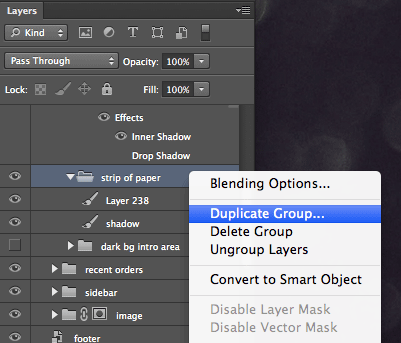
- Right click on the layer or group title and click "Duplicate Layer/Group"
- In the dialog that pops up, change the destination document to "New" and hit ok.
- Now you have a new photoshop document with just that isolated asset!
- In the menu bar, select Image > Trim... > Transparent Pixels
- Now your document is exactly the size of your asset, to the exact pixel
- Save for Web (works cleanly since you're saving the whole document - no accidental extras or generated filenames)
- Close your document.
And now you're back to your pristine Photoshop file, with your perfectly sized asset saved out and ready to go. There's nothing to undo to get back to where you were.
Now, let's look at how to set that up as an action.
The BEST way:
- Press F12
One keystroke, name that file, and you're onto the next one. How you do dis, you ask? ACTIONS my friend. Saving the steps listed in "A Better Way" as an action with a shortcut key is SUPER easy.
Here's how:
- Select the layer or group containing your asset
- Open your actions palette (window > actions)
- Hit the "Create New Action Button", and name it. (I called mine "Asset to File")
- Press record (figure a. below)
- Carefully repeat each step listed in "A better way", including closing the document
- Hit the stop button (figure a. below)
Your new action should now look something like this:
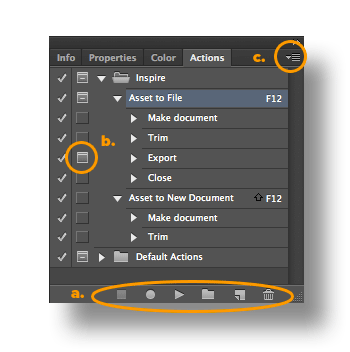
Make sure to switch on the "dialog on/off" toggle box next to "Export" (figure b.). This tells the action to pause when the save for web window appears, so that you can change your settings and name your file before exporting. At this point, you can use your action on another asset, by selecting it, and hitting the play button (figure a.)
The last step is to assign a function key.
- Select your action in the actions palette
- Open the actions palette context menu (figure c.) and select "Action Options"
- Choose a function key (and an optional modifier key if needed)
To save you some time, I've saved out this, and an alternate version of this action for you to download here. The alternate version only opens the layer in a new file and trims it. I bound this to shift + F12, and use it when I need to isolate the layer, but make adjustments before saving.
That's all I got! You now know how to make actions, and how to save out any layer or group with the press of a button. What are some of your favorite time-saving actions? I'd love to hear what tricks you guys and girls are using to speed up your build-out workflows.